
>
Create Vivid Lighting Illustration in Photoshop
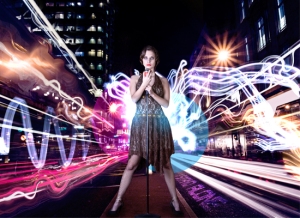 |
| Final Result |
Tutorial Requirements:
Difficulty: Meduim
Stocks: The Girl Singing has been removed from Shutterstock and is unavailable. | Street at Night
Resources: Lighting Effects Pack by Media Militia | Light Image
Open up your first Stock Image that you have in Photoshop.In our case it will be the Street at Night stock photo that we purchased on IstockPhoto. We will be working up from this stock photo so make sure you choose something that will fit your concept.

Step 2:
In this step we will be focusing on our model, I looked around quite a bit to find a decent model that would play a good role in the entire concept. I got this image from Shutterstock, it was a girl dressed to a fairly modern attire, but she was singing all by herself. I used the pen tool to extract her from the background of the image and place her in our newly created stock scene.

Now that we have our model situated in the piece, we have to make sure that it looks as if she was really standing in the middle of the street there. Firstly create a new layer go to Layer – New – Layer (Shortcut: CTRL+SHIFT+N) now drag that layer in underneath your models layer, so that your model layer is on top of the newly created layer. Now grab your Brush tool (Shortcut: B) and select black as your foreground color (RESET: Just press D) Now with a medium sized brush, brush underneath the models feet, make sure you don’t overdo it to much. Now go to Filter – Blur – Gaussian Blur and use a radius of about 60 Pixels. This will spread out the brush, you can use more or less, it depends on you.
Now that we have some realization in our piece open up the downloaded Lighting Effects Pack by Media Militia Open the image with the title -(Media_Militia_Lighting_Effects_050) now insert this image into your composition and set the blending mode to Linear Dodge. I then went to Image – Adjustments – Brightness and Contrast – I used this to dim the brightness a bit and put up the contrast the settings were: (Brightness | -6 ) ( Contrast | +15 ). Now position the lighting effect to where you want it in the piece.

Step 5:
Now that we have some flow going on in our piece, I want you to open this lighting image Insert it into your current composition and set the blending mode to Linear Dodge. Now go to Edit – Transform – Distort We have to position the image so that the light flows along with the low speed trails. The Distort option works perfectly to manipulate the image in the correct way. You could of course add much more to your composition, but make sure your image flows well.

In this step we will be creating two circles to backup movement and add some color to the piece. Create a new layer by going to Layer – New – Layer (Shortcut: CTRL+SHIFT+N) now drag this layer in underneath your model. Grab your Elliptical Marquee tool in the toolbar (Shortcut: SHIFT+M) and draw a circle behind your model, make it relatively big. Now with the circle selected, grab your fill tool (Shortcut: G) and use a Pink #ec008c color as your foreground color. Now fill the selected circle on the new layer you created earlier. Now deselect the circle by going to Select – Deselect or (Shortcut: CTRL+D) now set the blending options of this layer to Linear Dodge. Place the circle at your desired angle.
Now that we have some element to work off of, lets add some light to the model. Create a new layer and fill it with Black #000000 – set the blending mode of this layer to Linear Dodge and grab your brush tool. Set the foreground color of your brush to Blue #00aeef and with a small – medium sized brush, brush two dots on her waist. So that it looks as if there is a heavy light source behind her.
This is what the dots look like on a flat layer.

This is what we have so far.
Now we are going to call up our Adjustment layers for this piece. Firstly start off by going to Layer – New Adjustment Layer – Brightness/Contrast – Keep the brightness on 0, but drop the contrast to -30. Now Create a new layer (Shortcut: CTRL+SHIFT+N) and then Apply Image on this layer by going to Image – Apply Image or (Shortcut: CTRL+SHIFT+ALT+E) now that you have a applied image on top of all your layers go to Filter – Other – Highpass use 14pixels as your radius and hit OK. I understand the image is going to look strange, but set the blending mode to Soft Light and drop the opacity to 58% now erase the parts in the image you don’t want, the parts that are to sharp. Now that you have your layer sorted, go to Layer – New Adjustment Layer – Gradient Map – Use the standard Black to White gradient and set the Blending mode of the gradient to Luminosity and the Opacity to 72%.


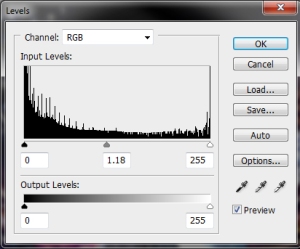
Now go back to Layer – New Adjustment Layer – Levels – We will be using the levels to brighten up the picture a bit. Set the Levels amounts according to the screenshot below. – Also erase some parts that you don’t like after you have applied the new adjustment layer.
Step 9:
In this step we are going to be making use of the Liquify Tool. Create a new layer and apply image in that layer by going to Image – Apply Image (Shortcut: CTRL+SHIFT+ALT+E) now go to Filter – Liquify this will bring up a dialog window with some tool that you will be able to use to manipulate the image at hand. Play around with the tools, varying the sizes of the brush and the effects. Once you are done, hit OK and then set your blending mode of your layer to Lighter Color. Now grab your Erase Tool (Shortcut: E) and erase the parts of the liquified image that doesn’t seem to fit into the composition. I ended up adding some Text for the preview of the Image, but you don’t have to. You are done with this tutorial. I hope you enjoyed it.


>well done